Tuesday, December 6, 2011
How to check OS version using InstallShield Basic MSI
This Basic MSI Sample shows how to quickly check OS version using an InstallScript function called by means of a custom action.
How to delete installed files on rollback
Sometimes you have an InstallShield project that installs additional files using SUPPORT FILES. If such installer fails for some reason, your support files won't necessarily be deleted.
There are multiple ways to achieve this. One would be to write an InstallScript method that removes the files you installed. Call this method from your Custom Action (using InstallScript Custom Action) and set it to execute only during Rollback Installation.
In order to do this, you can simply run the Custom Action Wizard.
Here is a sample that you can use.
This sample just attempts to install one text file and if Install fails (which will because I have added a SQL Connection and an invalid SQL script 'Select * from test' which won't get executed successfully), the rollback will occur and RollBack method gets called.
All you need is to write the InstallScript code to remove the correct files as per your requirements. I have added some commented sample code that might help you.
The sample was built with InstallShield 2012 Pro trial version so you should be able to run it if you get the same.
There are multiple ways to achieve this. One would be to write an InstallScript method that removes the files you installed. Call this method from your Custom Action (using InstallScript Custom Action) and set it to execute only during Rollback Installation.
In order to do this, you can simply run the Custom Action Wizard.
- Start the wizard by going to Custom Actions and Sequences and right click and select Custom Action Wizard.
- Let's suppose your InstallScript method that cleans up the files is CleanupOnRollBack(), in the wizard, give the same name for the custom action i.e. CleanupOnRollBack. Click Next.
- Select the type as 'Run Installscript code'. Click Next.
- In source, list of Installscript functions will be populated, select the CleanupOnRollBack(). Click Next.
- Under 'Return Processing' select 'Synchronous (Ignores exit code)'. Click Next.
- Under 'In-Script' execution, select 'Rollback Execution'. Click Next.
- On Next Screen you can leave Install UI Sequence as 'Absent from Sequence' and select Install Execute Sequence as 'After InstallInitialize'. You can change any other event as per your requirements.
- Click Next and Finish.
Here is a sample that you can use.
This sample just attempts to install one text file and if Install fails (which will because I have added a SQL Connection and an invalid SQL script 'Select * from test' which won't get executed successfully), the rollback will occur and RollBack method gets called.
All you need is to write the InstallScript code to remove the correct files as per your requirements. I have added some commented sample code that might help you.
The sample was built with InstallShield 2012 Pro trial version so you should be able to run it if you get the same.
How to launch log file after completing install
This sample shows how to launch installation log after the installer finishes. The sample is developed in InstallScript MSI project using InstallShield 2012.
In order to launch a log file after your installer runs you need to follow three steps:
That's it. Build the installer and run it, it should launch the log file now.

You can download the sample here.
In order to launch a log file after your installer runs you need to follow three steps:
- Get the log file path
- Add checkbox to SdFinish dialog
- If checkbox is checked launch the log file in Notepad
Now let's look at these steps in detail.
- To get a log file, enable logging by going to General Information tab in your InstallShield IDE and select 'Yes' for 'Create MSI Logs'.
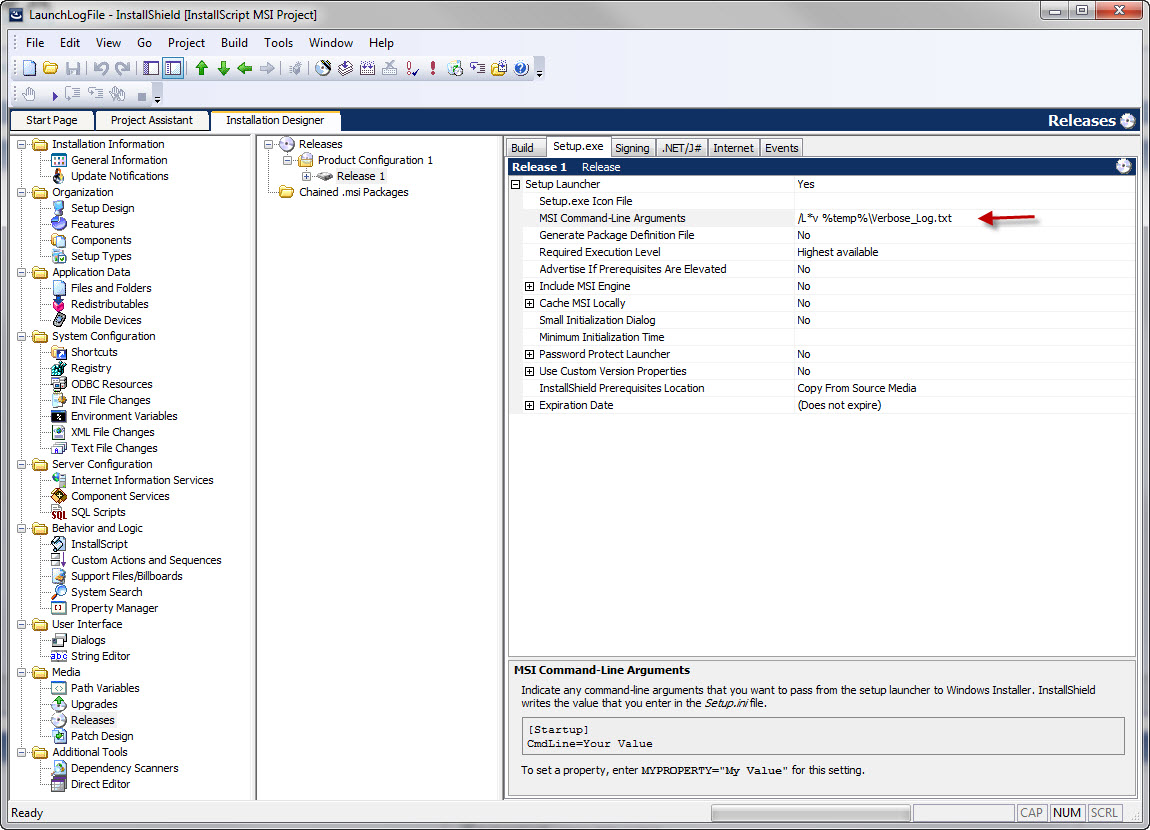
- Next you need to set log file name, so that each time you don't have to figure it out. For this, you need to go to Releases > Setup.exe tab and provide Command-Line parameter as shown in the screenshot below.
- Next step would be to add a checkbox to SdFinish dialog. Go to Dialog Editor, select SdFinish dialog and edit it to add a new checkbox. Note the Control Identifier.
- Next, go to Behavior and Logic > InstallScript view add the SdFinish code by selecting Dialog Source in first Dropdown at top of the screen and SdFinish in second dropdown. Code for SdFinish will automatically be added to your InstallScript. Edit it to add code shown below to case SD_PBUT_CONTINUE
// 1301 is Control Identifier for 'Launch log after finish' Checkbox on SdFinish dialog.
if(CtrlGetState( szDlg, 1301 ) = BUTTON_CHECKED) then
LaunchLogAfterFinish = TRUE;
endif;
- Next select 'AfterMoveData' from first dropdown and 'OnEnd' event in the second. Your OnEnd event should have code similar to:
function OnEnd()
STRING logFilePath, NotePadEXE;
NUMBER nResult;
begin
if( !REMOVEONLY ) then // So that you don't execute the same on uninstall..
//nResult = AskYesNo("Do you want to view log file now?", YES);
if(LaunchLogAfterFinish = TRUE) then
NotePadEXE = WindowsFolder + "\\Notepad.exe"; logFilePath = TempFolder + "\\Verbose_Log.txt";
LaunchApp(NotePadEXE, logFilePath); endif; endif;
end;
That's it. Build the installer and run it, it should launch the log file now.
You can download the sample here.
Subscribe to:
Comments (Atom)